

CentOSに対してGdriveをマウントしたいときはgoogle-drive-ocamlfuseを使うことでCifsのように扱うことが可能となります。
■参考にした記事
・CentOS 7 に google-drive-ocamlfuse をインストールできなかった
・Linux(CentOS)にgoogledriveを入れてみる
・sshごしにgoogle-drive-ocamlfuseのOAuth認証を行う方法
■手順
必要なパッケージのインスト―ル
まずは必要なパッケージをインストールします。
yum install epel-release
yum install sqlite-devel fuse fuse-devel libcurl-devel zlib-devel m4
yum install ocaml ocamldoc ocaml-camlp4-devel ncurses-devel
yum install patch unzip bzip2 bwrap darcs git hg bubblewrap gmp gmp-devel
opamのインストール
opamのインストールはopam公式サイトのリモートシェルを実行する必要があります。
sh <(curl -sL https://raw.githubusercontent.com/ocaml/opam/master/shell/install.sh)
※2019年4月のものです。うまく通らない場合は公式サイトからURLを確認してください。
opamの有効化
opamはユーザー単位で有効となります。
google-drive-ocamlfuseはrootユーザーではインストール失敗するため(そもそもopamがroot非推奨)ユーザーをまず作成します。
useradd <linux_username>
passwd <linux_username>
ユーザーを作り終えたらswitch userしましょう。
su - <作成したユーザー>
ユーザーを切り替えたらopamのビルドを行います。
※ここから先は上記手順で作成したユーザー(root以外)で実行してください。
opam init
数分待つ必要があります。
※うまくいかない場合
この手順の場合、事前にインストールしているため以下のエラーは発生しないはずですが、
パッケージが足りていないと次のようなエラーが出力されます。
足りていないパッケージを別途インストールしましょう。
[NOTE] Will configure from built-in defaults.
Checking for available remotes: none.
  - you won't be able to use rsync and local repositories unless you install
    the rsync command on your system.
  - you won't be able to use git repositories unless you install the git
    command on your system.
  - you won't be able to use mercurial repositories unless you install the hg
    command on your system.
  - you won't be able to use darcs repositories unless you install the darcs
    command on your system.

[ERROR] Missing dependencies -- the following commands are required for opam to
        operate:
  - patch
  - unzip
  - bwrap: Sandboxing tool bwrap was not found. You should install
    'bubblewrap'. See
    http://opam.ocaml.org/doc/2.0/FAQ.html#Why-opam-asks-me-to-install-bwrap.
完了すると次のような出力となります。
[NOTE] Will configure from built-in defaults.
Checking for available remotes: rsync and local, git, mercurial, darcs. Perfect!

<><> Fetching repository information ><><><><><><><><><><><><><><><><><><><><><>
[default] Initialised

<><> Required setup - please read <><><><><><><><><><><><><><><><><><><><><><><>

~中略

<><> Processing actions <><><><><><><><><><><><><><><><><><><><><><><><><><><><>
? installed base-bigarray.base
? installed base-threads.base
? installed base-unix.base
? installed ocaml-system.4.05.0
? installed ocaml-config.1
? installed ocaml.4.05.0
Done.
インストール後のUpdateを行います。
opam update
次の表示が出たら完了です。(Updateが無かった場合)
<><> Updating package repositories ><><><><><><><><><><><><><><><><><><><><><><>
[default] no changes from https://opam.ocaml.org
google-drive-ocamlfuseのインストール
いよいよgoogle-drive-ocamlfuseのインストールです。
※引き続き上記手順で作成したユーザー(root以外)で実行してください。
opam install google-drive-ocamlfuse
途中次のような表示がでるため「Y」を入力して先に進みます。
===== ? 6 =====
Do you want to continue? [Y/n] y
10分程度待ちます。
次の表示が出れば完了です。
<><> Processing actions <><><><><><><><><><><><><><><><><><><><><><><><><><><><>
? installed conf-gmp.1
? installed conf-gmp-powm-sec.1
? installed zarith.1.7
? installed cryptokit.1.13
? installed gapi-ocaml.0.3.10
? installed google-drive-ocamlfuse.0.7.3
Done.
# Run eval $(opam env) to update the current shell environment
google-driveの認証を行う(CLI)
Xがインストールされている場合は問題ありませんが(直接Chromeなどを利用して認証する)
CLI環境ではブラウザによる認証ができないため、別のPC(SSHのアクセス元)で認証を通してあげます。
※ここからはrootユーザを想定した手順です。
・ブラウザの起動Shellに見せかけた偽装ファイルを作成する
vi firefox
・上記ファイルの中身
#! /bin/sh
echo $* > /dev/stderr
作成後、実行ディレクトリにファイルを移動します。
mv ./firefox /bin/firefox
chmod 777 /bin/firefox
これでgoogle-drive-ocamlfuseを起動したときにアクセストークンの取得URLがコンソールに吐き出されます。
その前にrootユーザーは現在Pathが通ってないためパスを通してあげます。
export PATH=$PATH:/home/<使用したUser名>/.opam/default/bin/
ついでに次回起動時も使えるように.bashrcにも記載しましょう。
vi ~/.bashrc
※最終行に上記のexportコマンドを追加する。
ここまで出来たらコマンドを実行します。
通常ならブラウザが立ち上がって認証を促すのですが、今回は偽装ファイルによってアクセスするべきURLが出力されるはずです。
google-drive-ocamlfuse
実行すると以下のような出力がされますのでクライアントよりアクセスを行います。
/bin/sh: xdg-open: コマンドが見つかりません
https://accounts.google.com/o/oauth2/auth?client_id=5xxxxxxxx.apps.googleusercontent.com&xxxxxxxxxxxxxxxxxxxxxxxxxxxx
※ここからGUIが搭載された別PCから上記出力のURLへアクセスし作業してください。
お手元のPCからは通常通り認証を行ってください。
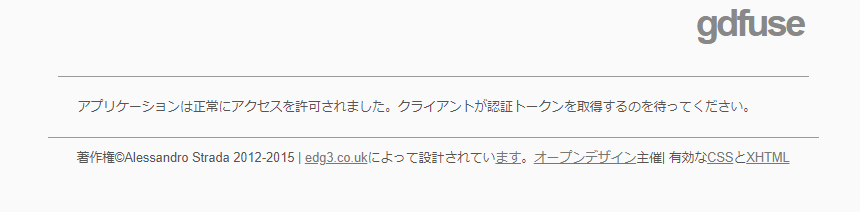
完了すると次のような画面になります。
※ここからはCentOS7に戻り作業してください。
上記画面が出た後しばらくするとコンソールが以下のような表示が出力されるはずです。
/bin/sh: xdg-open: コマンドが見つかりません https://accounts.google.com/o/oauth2/auth?client_id=5xxxxxxxx.apps.googleusercontent.com&xxxxxxxxxxxxxxxxxxxxxxxxxxxx
Access token retrieved correctly.
これで認証まで完了となります。
マウント設定を行う
マウントを行うために設定ファイルを作成します。
vi /usr/bin/gdfuse
chmod 755 /usr/bin/gdfuse
中身は次のように記載します。
#!/bin/bash
su <Googleの認証を行ったLinuxUser(root)> -l -c "/home/<使用したLinuxUsername>/.opam/default/bin/google-drive-ocamlfuse -label $1 $*"
exit 0
マウントポイントを作成します。
mkdir /<mountPointPath>
fstabを編集します。
vi /etc/fstab
fstabには次のように記述を追加します。
gdfuse#default <mount_point> fuse uid=0,gid=0,allow_other,user,_netdev 0 0
マウントを行います。
mount -a
エラーが起きなければ成功しています。
確認
[root@hostname ~]# df -h
ファイルシス            サイズ  使用  残り 使用% マウント位置
/dev/mapper/centos-root    17G  4.5G   13G   26% /
devtmpfs                  1.9G     0  1.9G    0% /dev
tmpfs                     1.9G     0  1.9G    0% /dev/shm
tmpfs                     1.9G   17M  1.9G    1% /run
tmpfs                     1.9G     0  1.9G    0% /sys/fs/cgroup
/dev/sda1                1014M  189M  826M   19% /boot
tmpfs                     379M     0  379M    0% /run/user/0
google-drive-ocamlfuse    8.0E  680G  8.0E    1% /googledrive
このようになっていれば完了。(GsuiteのGdriveをマウントしたため容量が8.0EBとなってます。)
速度はそれほどですが、バックアップ先にはちょうどいいと思います。
関連記事
[blogcard url=”https://szkhaven.com/2018/06/21/googlefilestream_save_drivechange/”]


